Prerequisites


Following Software’s need to be installed in your local machine to run this application successfully.
1) WBM 6.0.2.1
2) WID 6.02 with Fix pack 5
3) RSA 7.0
4) WAS 6.1 Fix pack 5 in RSA 7.0
5) Upgrade RSA 7.0 to RSA 7.0.0.3
Creating the Model in WBM
Creating a new Business Model project
To Create a Qual Modeling Project, Complete the Following Steps
1. Open WebSphere Business Modeller with <<workspace>> in your local.
2. Click on Cancel button on pop-up window when opening WebSphere Business Modeller.
3. To create new project/model Open File > New Business Modeling Project
4. In the Project Name Field, enter Qual.
5. In the Default Process Catalog Name Field, enter QualProcessCatalog.
6. Select the Check Box Field.
7. In the Name Field, Enter QualProcess then click on Finish button.
Import All the Business Items (i.e. All Existing (.xsd) Files)
To Import the .xsd Files, Complete the Following Steps
To Import the .xsd Files, Complete the Following Steps
1. Click “Apply 4-Pane Layout” icon in toolbar as shown below to view the “Project Tree” window.
2. Right-click on Project (i.e. Qual) at “Project Tree” window.
3. From the Pop-up menu click Import then select type as “Type Definition XML Schema (.xsd)” as shown below and click on next button.

4. Accept the default as “Yes” in the pop-up window.

5. Select “Source directory” which contains “.XSDs” and select “Target project” as Qual from drop-down box in Source and destination tab click on “Finish” button (wait until all Business items generated properly)

6. Accept “Ok” button for warnings as displayed below.

7. Verify the Business Items in “Project Tree” window as like below.
Create a Business Process Model
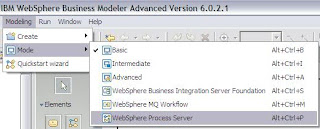
1. To create Business Process Model you need to change Modeling mode as “WebSphere Process Server” from Toolbar or Modeling option from menu bar as like below.


(OR)

2. Delete the “Start Node” and “Stop Node” in “QualProces” window by right click on nodes as shown below and save using Ctrl+S.

3. Right click on Process window then select New -> Map and change the name as PrepareCP.
 4. Drag “task” icon from panel to process window as like below then change the name as “CallCP”.


5. Right click on Process window then select New -> Map and change the name as PrepareOR.
6. Drag “task” icon from panel to process window as like below then change the name as “CallOR”.
7. Right click on Process window then select New -> Map and change the name as Prepare resp. Now your process window will display as like below.


8. Generate the flow using “Create Connection” option from panel and link all the maps and tasks one by one as like below.


Assign Input/Output Of Each Components
Click each Input and Output for Component in Attributes –Input/Output -> -General tab.
1. In Name Field is default it will be input or output.
2. In Associated Data Field, Click browse button and Select a Business Item.
3. All other Fields let default.


4. Select all the required Input and Output Business types. (Follow Step1, 2, 3).
5. Save the Project.
Finally The Process will be like

Exporting From WBM
To export From WBM, Complete the following
1. Right-click on the Project and Click Export.
2. Select Type as WebSphere Process Server from the pop-up window as shown below, click on next button.


3. Enter the Target Directory name to export the Process into File System.


4. Click on Finish button wait until export is done successful to display the pop-up window then click on OK button.


5. Verify the Target Directory (TESTWBM1) as contains Process and Business Items as like below.
Importing into WID
Create Business Integration Module
1. Open WID Workspace <<workspace>> and WID will open Business Integration Perspective.
2. Right click on Business Integration window New -> Other -> Module.
3. Enter Module Name as QS then click on Finish.
4. Uncheck Build Automatically option form Project -> Build Automatically option.
5. Enable Web Service developer capabilities from Window -> Preferences -> Workbench -> Capabilities -> select Web Service Developer check box then click on Ok.

6. Go to Window > Preferences > Web Services > Code generation > IBM Webservice runtime) check the following options are selected, if not please select the check boxes and click on Apply and OK buttons.

Import WBM Process into WID.
1. Right Click on Module QS -> Data Types select Import as shown below.

2. Select “File System” in Import pop-up window then click on next button.
3. Browse the location which contains “.XSDs” in From Directory select all “.xsd” then click on Finish button wait until all Business Objects imported successfully.

4. Right Click on Module QS select Import.
5. Select “File System” in Import pop-up window then click on next button.
6. Browse the location for “WBM Process File System location” in From Directory select “qualprocess” folder then click on Finish button wait until process is imported into WID successfully.

7. Now you can able to see Assembly Diagram as like below and save Assembly Diagram using Ctrl+S.

8. Verify your problems console doesn’t contain any errors.

Modifications in WID
1. Open QS -> Interfaces -> CallCP assign Input as “getCustomerProfileService” (Click on getCustomerProfileService -> Browse -> select “getCustomerProfileService” from Data Type Selection pop-up window -> ok).


2. Assign Output as “getCustomerProfileServiceResponse” (Click on getCustomerProfileServiceResponse -> Browse -> select “getCustomerProfileServiceResponse” from Data Type Selection pop-up window -> ok) and Save (Ctrl+S).
3. Open QS -> Interfaces -> CallOR assign Input as “OrderRetrievalRequestType” (Click on OrderRetrievalRequestType -> Browse -> select “OrderRetrievalRequestType” from Data Type Selection pop-up window -> ok).
4. Assign Output as “OrderRetrievalResponseType” (Click on OrderRetrievalResponseType -> Browse -> select “OrderRetrievalResponseType” from Data Type Selection pop-up window -> ok) and Save (Ctrl+S).
5. Open QS -> Interfaces -> QualProcess assign Input as “QualificationRequestType” (Click on QualificationRequestType -> Browse -> select “QualificationRequestType” from Data Type Selection pop-up window -> ok).
6. Assign Output as “QualificationResponseType” (Click on QualificationResponseType -> Browse -> select “QualificationResponseType” from Data Type Selection pop-up window -> ok) and Save (Ctrl+S).
7. Open QS -> Business Logic -> Process -> QualProcess accept the pop-up window click on Ok button.

8. Go to Properties -> Java Imports paste the below file contents.

9. Configure the Variable data types, go to Variables -> QualificationRequestTypeVariable -> Properties -> Details -> Browse -> enter “QualificationRequestType” in Filter field select QualficationRequestType from Matching Data types then click on Ok.

10. Go to Variables -> getCustomerProfileServiceVariable -> Properties -> Details -> Browse -> enter “getCustomerProfileService” in Filter field select getCustomerProfileService from Matching Data types then click on Ok.
11. Go to Variables -> getCustomerProfileServiceResponseVariable -> Properties -> Details -> Browse -> enter “getCustomerProfileServiceResponse” in Filter field select getCustomerProfileServiceResponse from Matching Data types then click on Ok.
12. Go to Variables -> OrderRetrievalRequestTypeVariable -> Properties -> Details -> Browse -> enter “OrderRetrievalRequestType” in Filter field select OrderRetrievalRequestType from Matching Data types then click on Ok.
13. Go to Variables -> OrderRetrievalResponseTypeVariable -> Properties -> Details -> Browse -> enter “OrderRetrievalResponseType” in Filter field select OrderRetrievalResponseType from Matching Data types then click on Ok.
14. Go to Variables -> QualificationResponeTypeVariable -> Properties -> Details -> Browse -> enter “QualificationResponseType” in Filter field select QualificationResponseType from Matching Data types then click on Ok. Click on Save button.
15. Then process will be displayed as like below.

16. Change the “Prepare CP” Snippet as Assign using right click on “Prepare CP” select Change type -> Assign.

17. “Prepare CP” activity changes as like below.
18. Select “Prepare CP” goes to Properties -> Details, select Variable from “From” drop-down box, and select QualificationRequestTypeVariable -> requestHeader -> transactionIdentifier.

19. Select Variable from “To” drop-down box, and select QualificationResponseTypeVaraible -> responseHeader -> transactionIdentifier then click on Save button. (Note when we are assigning From variable to To variable data type must match as same).
20. Change the “Prepare OR” Snippet as Assign using right click on “Prepare OR” select Change type -> Assign.
21. Select “Prepare OR” goes to Properties -> Details, select Variable from “From” drop-down box, and select QualificationRequestTypeVariable -> requestHeader -> transactionIdentifier..
22. Select Variable from “To” drop-down box, and select QualificationResponseTypeVaraible -> responseHeader -> transactionIdentifier then click on Save button.
23. Change the “Prepare resp” Snippet as Assign using right click on “Prepare resp” select Change type -> Assign.
24. Add a new mapping relation using New button in Properties -> Detail window.
25. Map the List of below Objects in Properties window of “Prepare resp” they are as like below:
a. Customer Object : select From variable as getCustomerProfileServiceResponseVariable -> getCustomerProfileResponse -> customer, select To variable as QualificationResponseTypeVariable -> qualifyCustomerRespone -> customer.
b. Add a new mapping relation using New button in Properties -> Detail window.

c. ResponseHeader Object: select From variable as getCustomerProfileServiceResponseVariable -> getCustomerProfileResponse -> responseHeader, select To variable as QualificationResponseTypeVariable -> responseHeader.
d. LineOfBusinessProfile Object: select From variable as getCustomerProfileServiceResponseVariable -> getCustomerProfileResponse -> lineOfBusinessProfile, select To variable as QualificationResponseTypeVariable -> qualifyCustomerRespone -> lineOfBusiness.
e. CrossLineOfBusiness Object: select From variable as getCustomerProfileServiceResponseVariable -> getCustomerProfileResponse -> crossLineOfBusiness, select To variable as QualificationResponseTypeVariable -> qualifyCustomerRespone -> crossLineOfBusiness.
f. ResponseMessageList Object: select From variable as getCustomerProfileServiceResponseVariable -> getCustomerProfileResponse -> responseMessageList, select To variable as QualificationResponseTypeVariable -> responseMessageList.
g. OrderDetail Object: select From variable as OrderRetrievalResponseTypeVariable -> orderDetailList -> orderDetails, select To variable as QualificationResponseTypeVariable -> qualifyOrderResponse -> orderDetailList -> orderDetail and click on Save button.
26. Add a Snippet between CallOR and “Prepare resp” by select snippet activity.

27. Change the link from CallOR to Snippet, and Snippet to “Prepare resp”.
Before  After
After
After 28. To arrange the contents properly right click on QualProcess -> select “Align Parallel Activities Contents Automatically”.
29. Select Snippet -> Properties -> Details -> Select radio button as Java then accepts “Yes” button paste the below file contents in TextArea then click on Save button.

30. Start WebSphere Process Server 6.0 in Servers tab, go to Servers tab select WebSphere Process Server6.0 -> Right Click and select Start (Wait until Server started successfully)

This comment has been removed by the author.
ReplyDeleteWow it is really wonderful and awesome thus it is very much useful for me to understand many concepts and helped me a lot. it is really explainable very well and i got more information from your blog.
ReplyDeleterpa training in chennai | rpa training in chennai
rpa training in pune | rpa online training | rpa training in bangalore
The knowledge of technology you have been sharing thorough this post is very much helpful to develop new idea. here by i also want to share this.
ReplyDeletepython training in velachery | python training institute in chennai
Nice post. By reading your blog, i get inspired and this provides some useful information. Thank you for posting this exclusive post for our vision.
ReplyDeleteData Science training in kalyan nagar | Data Science training in OMR
Data Science training in chennai | Data science training in velachery
Data science training in tambaram | Data science training in jaya nagar
Were a gaggle of volunteers as well as starting off a brand new gumption within a community. Your blog furnished us precious details to be effective on. You've got completed any amazing work!
ReplyDeletejava training in chennai | java training in bangalore
java training in tambaram | java training in velachery
tuzla mitsubishi klima servisi
ReplyDeleteümraniye bosch klima servisi
kartal arçelik klima servisi
pendik daikin klima servisi
kadıköy beko klima servisi
kartal lg klima servisi
ataşehir mitsubishi klima servisi
maltepe vestel klima servisi
üsküdar arçelik klima servisi